Feed Sizes That Keep Your Whole Photo
Instagram preserves the full composition when the photo's width-to-height ratio falls between its wide and portrait limits. The Instagram Help Center specifies 1.91:1 through 3:4, with images 320 to 1,080 pixels wide retaining their original resolution within that range; images outside the accepted ratios may be cropped.
Accepted feed formats and what they show
The dimensions below translate those accepted ratios into practical export canvases. Analyzify's Instagram size guide also lists 1080 × 1080 for square, 1080 × 1350 for portrait, and 1080 × 566 for wide.
A square 1:1 image (1080 × 1080 pixels) appears uncropped in the feed and works well for products, centred subjects, and grid-style sets. A portrait 4:5 image (1080 × 1350 pixels) also appears uncropped and gives portraits or products more room for vertical detail. With native portrait support, a 3:4 image (1080 × 1440 pixels) can show full-length figures and taller compositions without cropping.
For wide scenes, a landscape 1.91:1 image (1080 × 566 pixels) appears uncropped in the feed. A 9:16 image (1080 × 1920 pixels) suits full-height Stories but will not appear uncropped as a feed image. If your photo is wider or taller than the accepted feed range, Instagram may crop it; pad, split, or re-export it before uploading.
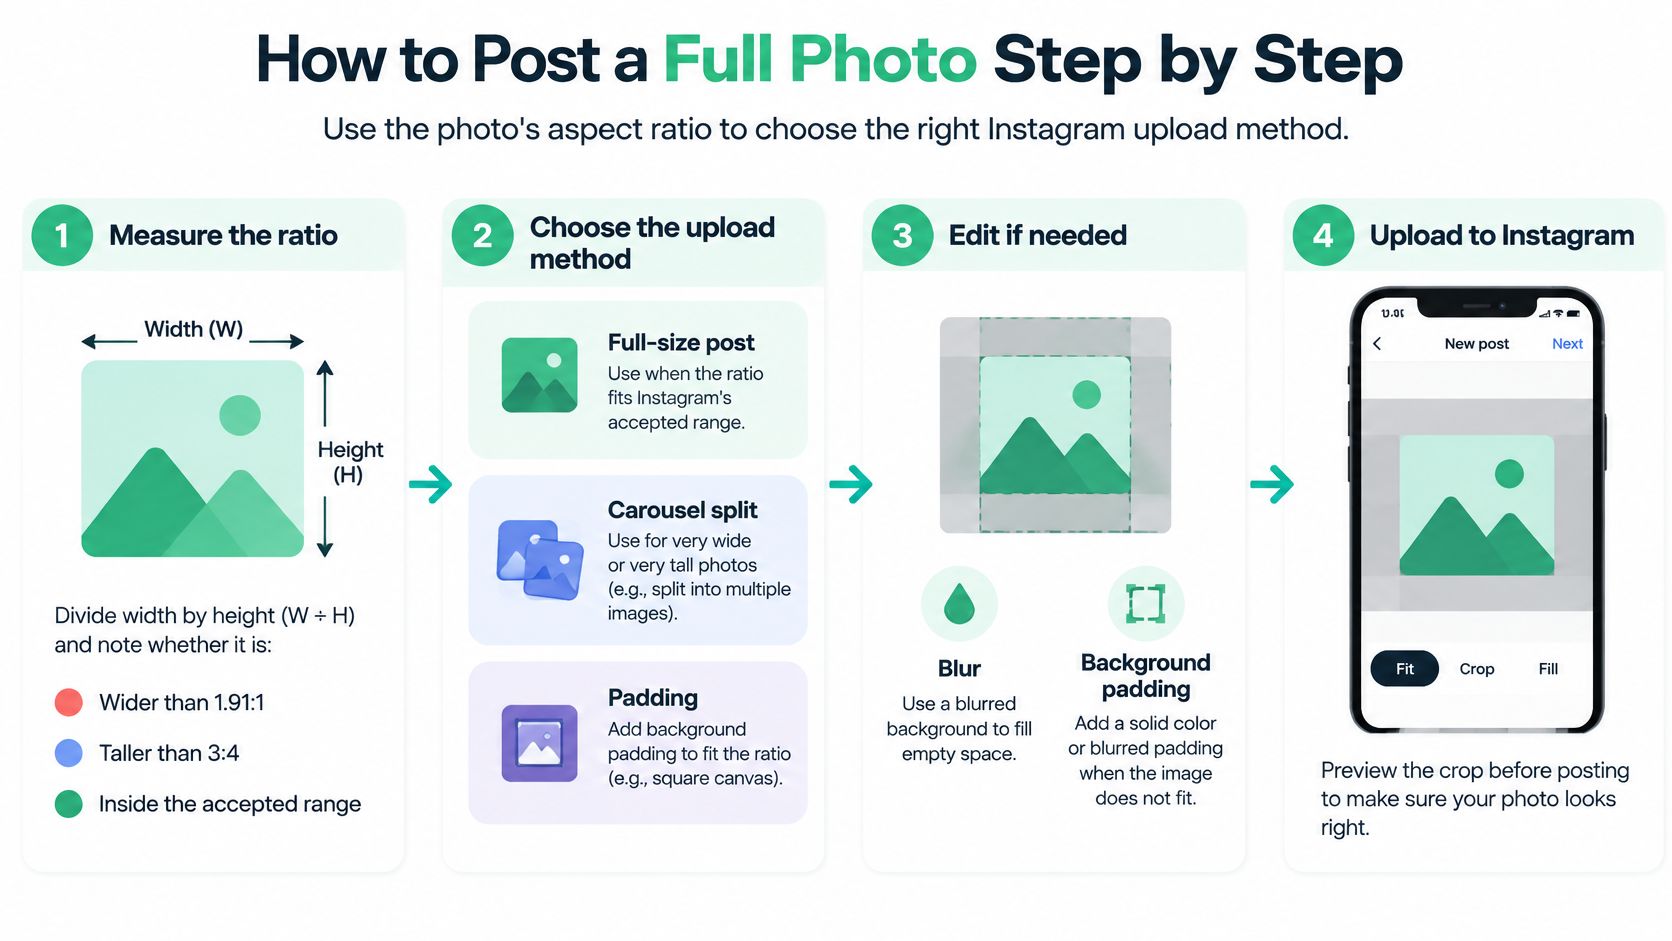
Run the pass-or-fail test: divide the original image's width by its height. A result inside the supported interval passes; a result outside it needs a different canvas, padding, or a split.
For example, dividing the tall portrait dimensions in the table produces 0.75, exactly the portrait boundary. Dividing the Story dimensions produces 0.5625, so that file is too tall for an uncropped feed upload. Those are calculations from the listed dimensions, not separate upload settings.
Why older advice insists on squares
Square borders aren't mandatory anymore. Instagram's product history records the introduction of portrait and horizontal uploads on August 27, 2015, ending the original square-only restriction.
That history matters because many tutorials still treat a square canvas as the universal solution. It works, but it can make a tall person or a wide scene unnecessarily small.
Practical rule: Choose the accepted canvas closest to the photograph's original shape. Add background only when preserving every edge requires it.
Use the Instagram post format size guide when preparing separate templates for different placements. Keep a reusable export preset for each format you publish, rather than forcing every photograph into one shape.
Also distinguish resizing from cropping. Resizing changes dimensions while preserving the composition; cropping removes image content. A smaller version of an unsupported shape still has an unsupported shape.
Choose Your Editor by Job
If the photograph already fits, use an editor that exports it cleanly. If it doesn't, choose a tool with canvas controls, background fills, or precise slicing rather than repeatedly dragging Instagram's crop handles.
Editing apps by job
Instagram's built-in editor is free and useful for checking the crop on the preview screen, but it offers few tools for padding or splitting. Snapseed is free and handles precise cropping and exposure edits before export, although padding takes manual work. Lightroom Mobile has a free tier with paid upgrades and suits colour and exposure edits with export controls; padding and splitting are manual.
Canva has a free tier and makes custom canvases and background fills easy, though some assets and export options depend on your plan. CapCut also has a free tier and supports canvas sizing and blurred photo backgrounds, but its video-focused interface can slow down a quick photo export.
Snapseed makes sense when the composition already works, and the photograph just needs exposure, straightening, or a deliberate crop. Lightroom Mobile is a better fit when consistent colour across a campaign matters more than decorative backgrounds.
For layouts, Canva is straightforward: create the destination canvas, place the image, and adjust the empty space. CapCut is useful when you want a blurred background, especially if you already use it for video.
Pick the tool that solves the missing job. Don't move a finished photograph through several apps just because each has an Instagram preset.
Check the export before committing
A free editor isn't necessarily free for every asset or export option. Open the download controls before building a complicated layout, and check the output dimensions, watermark status, and any paid elements.
Instagram's own editor should remain the final preview, not the place where you rescue an awkward canvas. If a tool exports your chosen format cleanly without stretching the photograph, it can do this job. Familiar controls usually matter more than another subscription.
How to Post a Full Photo Step by Step
Measure the original, build a supported canvas, and upload the finished file without zooming back into it. Keep an untouched copy of the photograph so an accidental crop never becomes your only version.
This visual summarises the decision process.
Prepare the file
Measure the original. Open its information panel and divide width by height. Use the actual file dimensions, not how tall the image looks on your phone; a screenshot may include extra space that changes the calculation.
Choose the destination canvas. For a broadly useful portrait template, CapCut recommends a 1080 × 1350-pixel, 4:5 post. That's a practical default, not permission to crop every photograph into it.
Fit the photograph without stretching it. In Canva, create a custom canvas, add the image, and scale from a corner with its proportions locked. If you only need a dedicated sizing utility, MyImageUpscaler's tool to resize photos for Instagram is another option; inspect whether the selected operation fits, pads, or crops before downloading.
Add background only where necessary. Sample a colour from the photograph's edge, then place that colour behind the image. Use the padding or blur approaches below if the full photograph leaves substantial empty space, rather than enlarging it until the edges disappear.
Export and publish
Export a high-quality JPEG in sRGB. This gives you a predictable photographic file and colour workflow, though Instagram can still recompress the upload. Avoid sending the image through messaging apps or saving repeated compressed copies before posting.
Open Instagram and select the prepared file. Tap the plus button, choose the post option, and use the available aspect-ratio or expand control to inspect the complete canvas. Don't assume the initial zoomed preview is the only framing available.
Inspect the edges before sharing. Check shoes, hair, packaging, signage, and anything close to a corner, then add your caption and publish. Filters, accidental pinch gestures, and selecting the wrong export can undo otherwise correct preparation.
A successful opened post shows the whole intended composition with comfortable breathing room. If something is missing there, fix the file or framing rather than trying to solve it through the caption or profile layout.
Padding, Blur and Carousel Splits for Oversized Photos
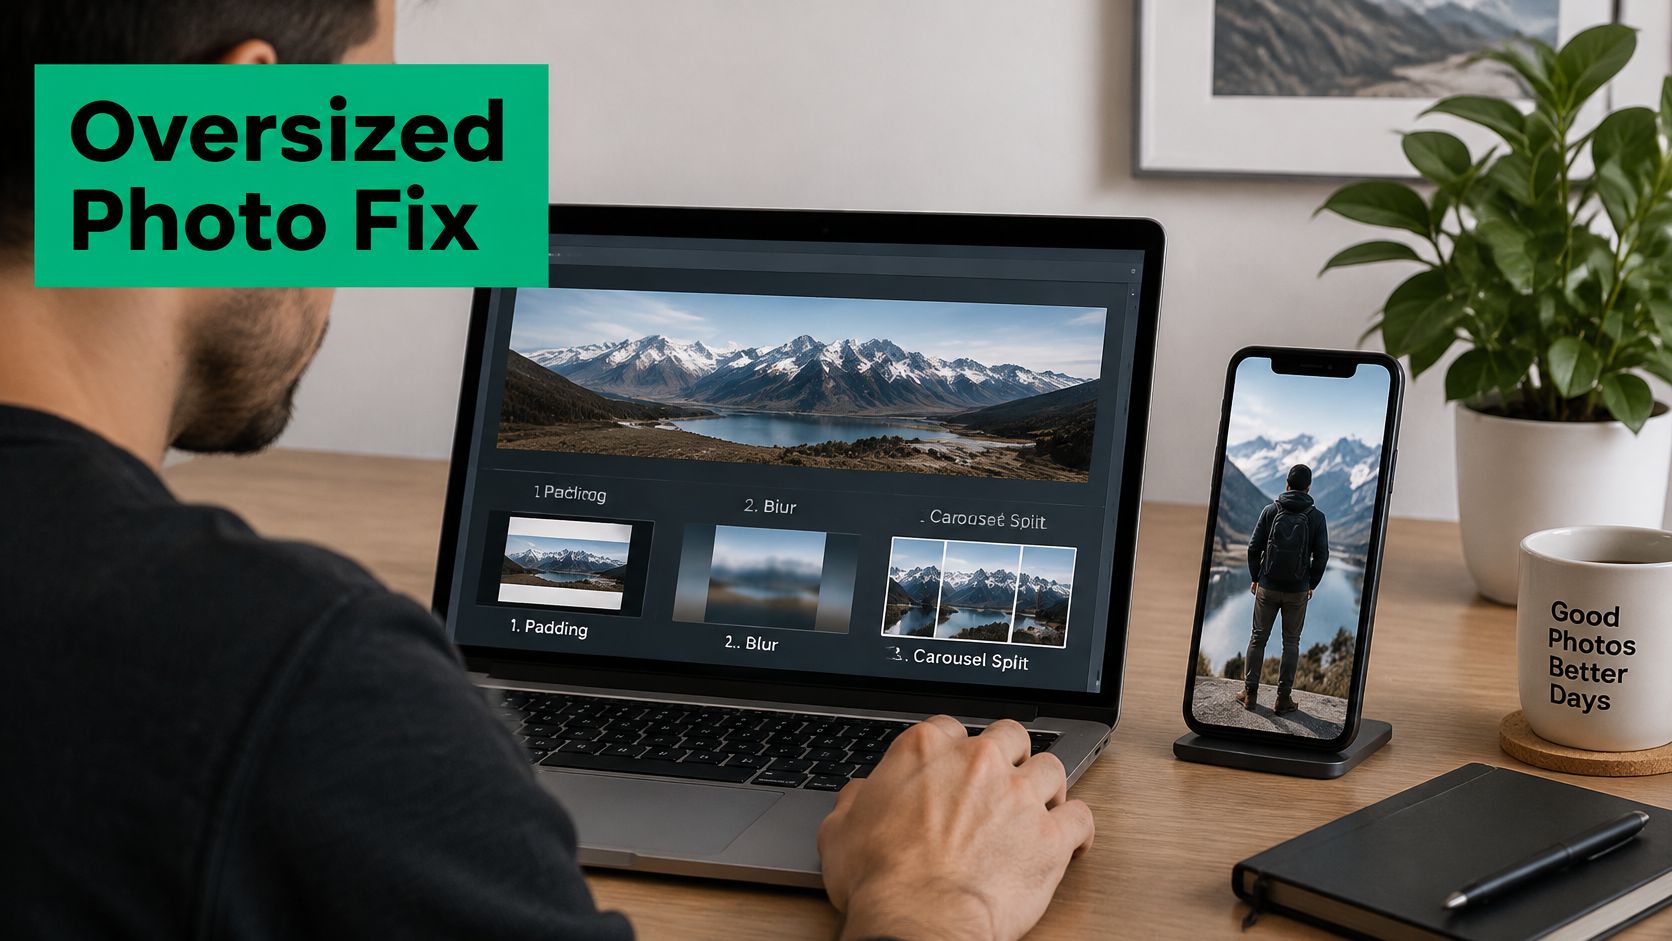
A panorama can contain every detail you want and still be the wrong shape for a single feed image. The key choice is whether you'll accept a smaller subject, a decorative background, or a sequence of separate views.
The editing setup below illustrates those options.
Padding and blurred backgrounds
Plain padding is the least destructive approach. Centre the original photograph on your chosen canvas and fill the exposed area with a colour sampled from its edge. It suits products against simple backdrops because the added space can look intentional.
Don't promise yourself a thin border before fitting the photo. The original shape determines how much background you need; keeping every pixel of a very wide scene may require substantial space above and below it.
A blurred background makes that space less stark. Duplicate the image, enlarge the lower copy until it covers the canvas, blur it, and place the sharp original above it. Reduce the background's contrast if bright shapes compete with the subject.
Another option is to expand images for social campaigns with Nereo when you want background extension rather than visible borders. Treat generated surroundings as new content: inspect lettering, architecture, reflections, and product edges before using the result commercially.
Carousel splits
A carousel split preserves scale at the cost of a swipe. Cut the panorama into equal canvases, export them in sequence, and select them in that same order.
Use guides to make adjoining edges continuous. Keep faces and important lettering away from cut lines, and avoid independently resizing slices after cutting them. Overlapping content can help during editing, but duplicated strips in the final exports create a visible jump.
Check the carousel capacity available in your current Instagram composer before committing to a long sequence. Don't design around an assumed slide allowance, especially when a scheduling tool will handle publication.
The Instagram carousel post examples can help you decide whether the panorama needs an introductory cover. Choose padding for complete-at-a-glance viewing, blur for a softer background, and splitting when image detail matters more than seeing everything simultaneously.
Full-Frame Stories Workarounds
Stories use a full-screen vertical layout, so a feed-shaped photograph needs its own composition. Filling the screen by enlarging the photograph can remove its edges; fitting it completely usually leaves background space.
Figma's Instagram photo-size guide specifies a 1080 × 1920-pixel, 9:16 Story canvas and recommends a 5–8% visual safety margin around critical details. Build the background into that file instead of leaving the final framing to chance.
Build and upload the Story
Create a dedicated Story canvas in Canva or your preferred editor. Start with the destination layout rather than stretching a finished feed graphic.
Place the original photograph in the centre with its proportions locked. Use a solid fill or a blurred duplicate behind it if you want the surrounding space to feel deliberate.
Export a high-quality JPEG using the full canvas dimensions. Check that you've downloaded the whole design, not just the photograph inside it.
Open Instagram, tap Your story or the plus button, and choose Story. Select the prepared file from your gallery.
Pinch to scale and drag to reposition only if necessary. Enlarging the prepared canvas can bring the crop back, so watch its outer edges.
Preview before publishing. Check the photograph first, then inspect any stickers, captions, links, or other additions.
Protect the important details
Keep text, faces, and key products away from the top and bottom interface areas. The profile information and reply controls can make content near those edges harder to see or use.
Story check: If viewers need to read it, don't put it against the edge, even when the export preview looks clean.
A raw panorama won't become a full-screen composition just because you select Story. Text close to corners is another common failure, especially when you add it before deciding how the photograph will fit.
Use the Instagram Story guide for placement and publishing decisions beyond the image itself. Choose Stories for a vertical presentation, and prepare a separate feed export when the photograph also needs a permanent place in your profile grid.
Profile Grid Check and Pre-Post Checklist
The opened post and the profile tile are different previews. A photograph can preserve every edge when opened while losing a face, label, or part of the product in the grid.
Kapwing's full-photo guide dates native 3:4 support to May 2025, describes the grid's potentially centre-cropped thumbnail treatment, and reports that publishing API support remained limited to 4:5 after the in-app change. Treat that API observation as a reason to test your scheduler, not a guarantee that every publishing tool has the same restriction today.
Diagnose the view that failed
Don't rebuild the entire image until you know whether the problem occurs in the opened post, the profile thumbnail, or the scheduled preview. Each requires a different fix.
If the full photo appears when opened but faces are cut off in the grid, the profile tile is likely centre-cropped. Keep the subject central and inspect the finished tile. If the photo is still cropped after upload, its canvas ratio may be unsupported, or the framing may be zoomed in. Re-export on an accepted canvas and upload it again.
A soft or blocky photo may come from a small source, low export dimensions, or heavy compression. Return to the original file and make a high-quality export. If a scheduled post has a tighter portrait crop, the scheduler may support a different format from the app. Test a manual post or prepare a canvas the scheduler accepts.
When text is clipped at the edges, move the lettering inward before export to give it more safe space. If a carousel seam is visible, the cuts may be misaligned or the slices scaled differently. Re-cut them from one master image so their adjoining edge pixels match.
For a product launch, centre the essential item and move supporting text inward. You can still use an off-centre composition, but understand the trade-off: the opened photograph may look elegant while the profile tile becomes harder to understand.
For scheduled work, inspect the tool's actual preview after uploading the final file. A template labelled Instagram portrait doesn't establish what that particular publishing connection will accept.
Run the final checks
Use this checklist before sharing, then inspect the finished grid tile immediately after publication. You can preview the likely crop beforehand, but you can't verify a published tile before it exists.
Measure the ratio. Confirm the exported canvas fits the intended placement.
Check export dimensions. Use your full-resolution Instagram preset, not a small preview download.
Keep the subject central. Make sure the tile still communicates the photograph's purpose.
Respect safe margins. Leave breathing room around text, faces, and product details.
Verify both views. Inspect the upload preview before sharing, then open the post and check its profile tile afterward.
Correct sizing protects the composition. Checking both views protects how people encounter it.
Gainsty offers a free Instagram analysis tool that works with a public username and doesn't require a login. Once your photos display the way you intended, visit Gainsty to review your profile and identify what to improve alongside your visual presentation.