Why GIFs Are Your Secret Weapon for Instagram Engagement
Before we get into the “how-to,” let's talk about the “why.” GIFs are so much more than just quirky, looping animations. They're a killer communication tool that can literally stop people from scrolling past your content.
Think about it: in a feed packed with static images, even the slightest bit of motion immediately snags the eye. That simple visual hook can make someone pause on your post just a little longer. More importantly, GIFs are incredible at conveying emotion, humor, and personality in a way a photo just can't match. They make your brand feel more human and plugged into internet culture.
Tapping into Viral Culture
GIFs are the lifeblood of memes and viral trends. When you use a popular reaction GIF or create one that fits your brand's voice, you're instantly speaking your audience's language. It builds a sense of community and shows you're not just a faceless company; you're part of the conversation.
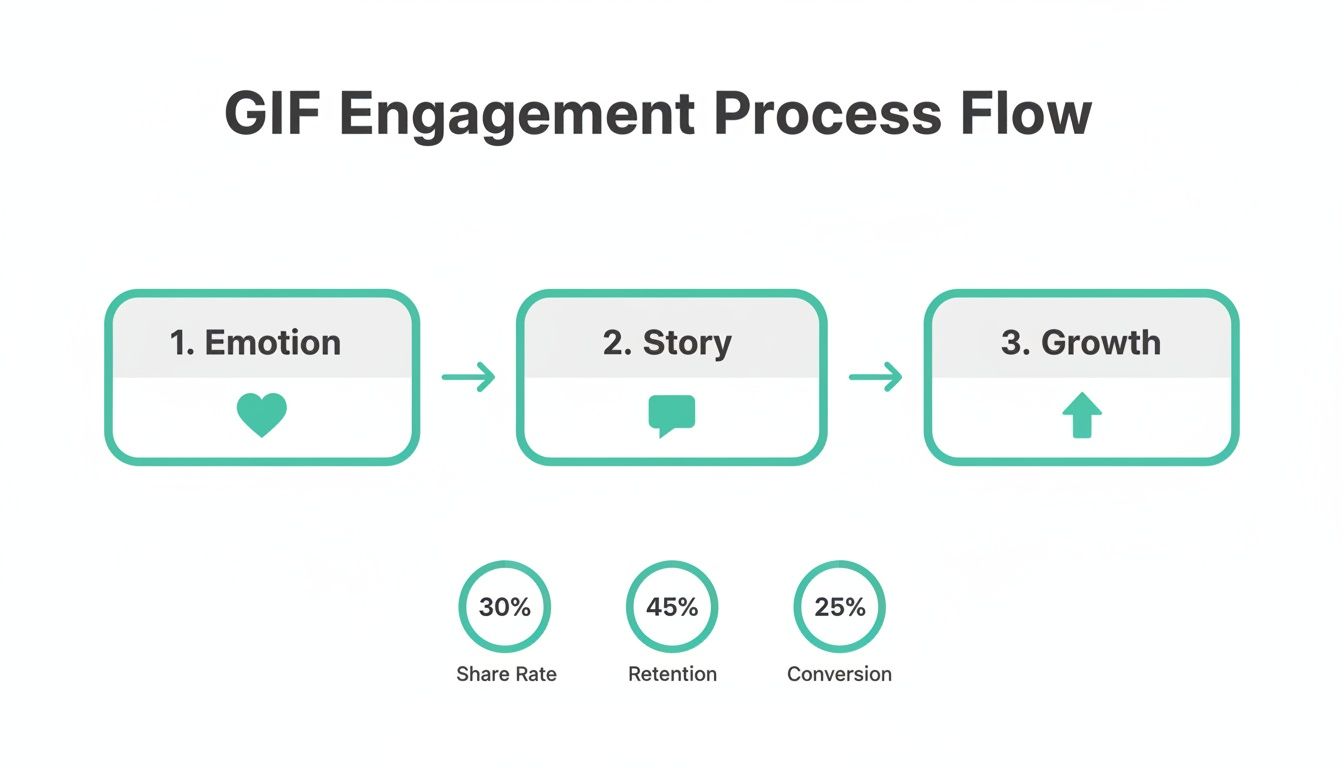
The real magic of a GIF is its power to tell a tiny, looping story. It can showcase a product feature, reveal a quick before-and-after, or just capture a feeling that connects with your followers on a gut level.
Boosting Key Engagement Metrics
The dynamic nature of GIFs has a real, measurable impact on your performance. Because they're treated as short videos, they add to your account's total video watch time—something the Instagram algorithm definitely pays attention to. This can give your reach a nice little boost. For a deeper dive, refer to our guide on how to increase Instagram engagement with different kinds of content.
And the numbers back this up. Nearly 45% of total Instagram engagement now comes from Reels, a format built on the same short, looping visual style that makes GIFs so addictive. This shows users are already hungry for this type of content. It's an especially powerful move for smaller accounts; those with under 10K followers have seen engagement rates hit 0.65% just by adding GIF-style videos into their mix, according to Meltwater's Instagram stats.
How to Convert Any GIF into an Instagram-Ready Video
Here's the one thing you must know before posting a GIF to your Instagram feed: you can't. At least, not directly.
If you try to upload a standard .gif file, Instagram will just treat it as a static image. All that looping motion you wanted? Gone. The secret is to quickly convert your GIF into an MP4 video file, which Instagram loves.
It sounds way more technical than it is. You don't need fancy video editing software; a handful of free online tools can get the job done in seconds.
Picking the Right Conversion Tool
For most of us, a simple, browser-based converter is the perfect solution. They're fast, free, and incredibly easy to use. I find myself turning to these all the time for quick social media prep.
A couple of my go-to options are Ezgif and CloudConvert. Both let you upload your GIF, make a few quick tweaks if required, and download it as an MP4 without slapping a distracting watermark on your content. That's a massive win.
For those who want a bit more control over the final output—think fine-tuning frame rates or resolution—desktop software like HandBrake is a fantastic, more powerful option. But honestly, for everyday Instagram posts, an online tool is all you really need.
No matter which tool you use, it’s a good idea to keep the platform's general Instagram video length limits in mind to make sure your final video will upload easily.
A Quick Comparison of Free Converters
To help you decide, here’s a quick rundown of some popular free tools I’ve used for turning GIFs into Instagram-ready MP4s.
Ezgif is best for quick, no-fuss file conversions. It offers a simple interface with basic editing tools like resizing and cropping, and it doesn’t add watermarks. However, it lacks advanced features, and the interface can feel a bit outdated.
CloudConvert is ideal for users who require versatility across many file types. It supports over 200 formats and integrates with cloud storage services, making it very flexible. The main drawback is that the free plan comes with daily conversion limits.
FreeConvert works best for handling large files and batch processing. It supports files up to 1 GB and allows multiple conversions at once, which saves time. The downside is that ads on the site can feel intrusive.
VEED.IO is an all-in-one option for users who want both editing and converting in one place. It includes a built-in video editor, audio tools, and subtitle creation. The limitation is that the free version adds a watermark to exported videos.
Ultimately, for a straightforward GIF-to-MP4 job, Ezgif is usually the fastest path. If you need to handle other file types or want more editing features baked in, one of the others might be a better fit.
Optimizing Your Settings for a High-Quality Post
You’ve gone to the trouble of finding the perfect GIF; don't let a blurry, pixelated video ruin it. The best way to get a crisp result is to start with a high-quality GIF in the first place.
When you're converting, if the tool gives you options for resolution, try to match Instagram’s preferred formats. A good rule of thumb is 1080×1080 pixels for a square feed post or 1080×1920 pixels for a vertical Story or Reel. If you want to dive deeper into getting the best video quality, we have a whole guide on how to upload high-quality videos to Instagram that's worth a read.
My Biggest Tip: Your final MP4 video needs to be at least 3 seconds long. Instagram won't even let you post a video shorter than that. Thankfully, most conversion tools are smart enough to automatically loop a short GIF to meet this minimum length, but it's always good to double-check before you download.
This technical step of conversion might seem small, but it’s what unlocks the ability to use GIFs for real audience engagement. A well-placed GIF can tell a micro-story, evoke an emotion, and ultimately drive connection and growth.
Think of the conversion as the bridge between finding a great piece of content and actually using it to make an impact with your audience.
Using GIPHY and Live Photos for Dynamic Instagram Stories
Instagram Stories are a playground for creativity, and thankfully, they offer much more direct ways to use GIFs than the main feed. Instead of messing with file conversions, you can tap into native features and a few clever workarounds to add motion that grabs attention instantly.
Two of the easiest and most powerful methods involve using GIPHY's massive library and a smart trick for iOS users involving Live Photos. Both techniques can elevate your story from a simple image to an engaging, dynamic experience.
Tap into the GIPHY Sticker Library
The most straightforward way to start posting a GIF on Instagram Stories is by using the built-in GIPHY sticker feature. It’s seamlessly integrated right into the app and only takes a few taps.
Once you’ve snapped a photo or uploaded a video for your Story, tap the sticker icon at the top of the screen. You'll see an option for “GIF.” Tapping this opens a search bar connected directly to GIPHY's enormous database of animated stickers.
You can search for just about anything, from a simple “good morning” to a niche pop culture reference. When you find the perfect one, just tap it to add it to your Story. From there, you can pinch to resize, rotate, and place it anywhere you like. It's the perfect way to add a quick reaction or a touch of humor to your content.
Pro Tip: For brands, the real power comes from creating your own branded GIFs. By getting a verified brand channel on GIPHY, you can upload your company logos, product animations, or custom reactions. When tagged correctly, they become searchable for everyone on Instagram, turning your followers into brand ambassadors.
Create Your Own Branded GIF Stickers
Getting your GIFs into the Instagram ecosystem is a total game-changer for brand visibility. Here's the general roadmap to make it happen:
Create Your GIPHY Brand Channel: First things first, you'll need to apply for a brand account on GIPHY. This process usually involves proving you're a legitimate business or artist.
Design Your GIFs: Get creative and design high-quality, transparent GIFs that reflect your brand. Think animated logos, fun taglines, or character animations. Simplicity often works best.
Upload with Strategic Tags: Once your channel is approved, you can start uploading your creations. The most critical step here is adding relevant tags. Think about what users would actually search for to find your GIF, including your brand name, product names, and general terms like “happy,” “dance,” or “coffee.”
Following these steps turns the GIPHY sticker feature from just a fun tool into a serious marketing channel.
The iOS Live Photo Workaround
What if you want a GIF to take up the entire screen of your story, not just pop up as a small sticker? For iPhone users, there’s a brilliant workaround using Live Photos.
You'll first need to save your chosen GIF to your phone. An easy way to do this is by using the GIPHY app. Just find the GIF you want, tap the three dots, and select “Convert to Live Photo.”
Next, head over to Instagram Stories and swipe up to open your camera roll. Find the Live Photo you just saved—it’ll have a small concentric circle icon in the corner. Once you select it, press and hold the photo. You'll see options like “Boomerang” appear at the top.
By selecting the Boomerang effect, Instagram turns your Live Photo into a looping, full-screen video that perfectly mimics a GIF. It’s an incredibly effective way to create immersive, eye-catching Story content without needing any external conversion tools.
Go Pro with Third-Party Apps and Reels
While an online converter is great in a pinch, you'll eventually want more creative firepower. That's where dedicated third-party apps come in, opening up a whole new world of control. These apps are basically mini-studios in your pocket, built not just to convert but to create eye-catching, Instagram-ready animations from the ground up.
Think of apps like ImgPlay or GIPHY CAM. They let you do so much more than just convert. You can clip videos into perfect GIFs, string photos together for a cool stop-motion effect, or add text and filters before saving everything as a clean MP4. The entire process is seamless, happening right on your phone without ever needing a desktop.
If you're looking for even more options, you can dive into an entire suite of powerful Instagram video editing apps that offer similar GIF-making features.
Taking Your Content to the Next Level with Specialized Apps
The real magic of using a dedicated app is the customization. You get to fine-tune every little detail—tweak the playback speed, reverse the loop for a Boomerang effect, and add creative overlays that make your content pop.
Let's say you run a coffee shop. In under a minute, you could use an app to capture a quick loop of steam rising from a latte. Then, you can add your logo as a subtle watermark and export it as a perfect square video ready for your feed.
It's not just about getting a GIF onto Instagram; it's about making content that feels like it belongs on Instagram. Third-party apps help you do just that by building in platform-specific formats and features from the very start.
This level of control feeds directly into your overall content strategy. Posting dynamic, GIF-style content consistently can really move the needle on your account's growth. Buffer’s research shows that jumping from 3-5 posts a week to 10+ can boost follower growth from +0.26% to +0.66%. A solid GIF strategy makes hitting those higher numbers much more achievable.
Turning Your GIFs into High-Performing Instagram Reels
Once you've created your custom, looping video, the best place for it is often Instagram Reels. The format is a natural fit for GIF-style content—it's short, attention-grabbing, and designed for repeat viewing. By posting your GIF as a Reel, you can break out of your follower bubble and reach a much wider audience.
The Reels algorithm loves content that hooks viewers instantly, and a funny, relatable, or mesmerizing GIF is perfect for the job. After you have your MP4 file ready, upload it directly into the Reels editor.
From there, you can really amplify its impact:
Add Trending Audio: Layer a popular song or sound over your silent GIF. This is one of the easiest ways to tap into current trends and boost discoverability.
Use On-Screen Text: Add captions or a call-to-action that appears and disappears to add another layer of motion and provide context.
Pick a Great Cover: Don't forget to choose an engaging cover photo for your Reel. It's the first thing people see on your profile grid, so make it count.
This approach turns a simple animation into a genuine growth tool. If you want to get superb at this, it's worth learning how to make Reels with existing video, which will give you even more ideas for repurposing your converted GIFs.
5 Essential Tips for High-Impact GIF Posts
Getting a GIF onto Instagram is one thing, but making it actually work for you is another entirely. A few smart adjustments can turn a simple animation into a scroll-stopping piece of content that gets people talking.
Before you even think about uploading, consider where your GIF is going to live on the platform. Each format has its own unique real estate, and fitting your content to that space is the first step to making it look polished and professional.
For the feed: Stick with a square 1:1 aspect ratio (1080×1080 pixels). This is the classic Instagram look, and it guarantees your post won't be awkwardly cropped.
For Stories & Reels: You have to go vertical. A 9:16 aspect ratio (1080×1920 pixels) fills the whole screen on a phone, creating a much more immersive experience for your viewers.
Get the Technical Details Right
The quality of your converted MP4 file really matters. Instagram has its set of rules, and if you follow them, your content will look sharp and play smoothly.
The big one is video length. For that perfect, mesmerizing loop that feels like a true GIF, keep your video under 15 seconds. Honestly, shorter is usually better—a quick, snappy loop is more likely to be watched over and over. Just remember that Instagram requires all videos to be at least 3 seconds long, so if your original animation is super short, your conversion tool will probably need to loop it a few times to meet that minimum.
Moreover, watch your file size. Big files often get heavily compressed by Instagram, which can leave you with a blurry, pixelated mess. A smaller, well-optimized file will not only upload faster but will also hold onto its quality much better.
Don't Forget the Finishing Touches
A great GIF can easily get lost in the noise without the right strategy behind it. The stuff you wrap around your visual is just as important as the animation itself.
Your caption is where you give your GIF context. Use it to tell a quick story, ask a question, or add a call to action that encourages people to do more than just double-tap.
And of course, hashtags are your best friend for getting discovered. Use a smart mix of broad, niche, and branded hashtags to attract viewers beyond your follower base. For instance, if you're a local coffee shop, you might use #coffee, #latteartloop, and #TheDailyGrindCafe to cover all your bases.
Pro-Tip: Make it Accessible. Always take a moment to add alt text. Writing a simple description (like, "Animated GIF of steam rising from a coffee cup in a continuous loop") makes your content accessible for visually impaired users. It also gives Instagram's algorithm more context, which can give your post a nice little visibility boost.
By mixing these technical tweaks with smart strategy, you're setting every GIF up to grab attention and get people engaged.
Got Questions About Instagram GIFs? I’ve Got Answers.
Even with the right methods, you might hit a few snags trying to get your GIFs on Instagram. It happens. Let's walk through some of the most common questions I hear so you can get past the roadblocks and post like a pro.
So, Can I Just Post a GIF Straight to My Instagram Feed?
The short answer is no. If you try to upload a file ending in .gif directly to your feed or as a Reel, Instagram will just grab the first frame and treat it like a static picture. It’s a common mistake, and the result is usually a still, often blurry image instead of the cool animation you wanted.
The trick is to first convert that GIF into a video format, like an MP4. Don't worry, this sounds more technical than it is. There are a ton of free online tools and simple mobile apps that can do this for you in a matter of seconds.
Why Does My Awesome GIF Look So Blurry on Instagram?
Ah, the dreaded blurriness. It's incredibly frustrating to see your sharp animation lose its quality, and it often boils down to one of two culprits: a low-quality conversion or Instagram’s own heavy-handed compression.
To combat this, you have to start with the best possible source material. Always use the highest-resolution GIF you can find. When you convert it to MP4, dig into the settings and crank the quality up to the max. Another pro tip is to size your video to Instagram's preferred dimensions before you upload. For a square post, that's 1080×1080 pixels. This stops Instagram from aggressively resizing and compressing your work.
Key Takeaway: High-quality output starts with high-quality input. You can't upscale a tiny, pixelated GIF and expect a crystal-clear video. Start sharp to stay sharp.
How Do I Get My Own Branded GIFs into Instagram Stories?
Getting your own custom GIFs to appear in the Instagram Stories sticker search is a brilliant marketing move, and the official path runs through GIPHY. You'll need to apply for and get approved for a GIPHY Brand Channel.
Once you're verified, you can start uploading your branded animations. The real magic, though, is in the tagging. Think like your audience—what keywords would they search for to find your stickers? After your GIFs are uploaded and tagged properly on GIPHY, they’ll become searchable within Instagram. It’s a fantastic way to boost organic visibility.
What's the Sweet Spot for GIF-Style Video Length?
For that classic, looping GIF feel, shorter is almost always better. I’ve found the sweet spot for a GIF-style video on Instagram is somewhere between 3 and 10 seconds.
This gives just enough time to let the animation play out clearly, but it's short enough to keep people watching it loop over and over. While an Instagram Reel can technically be much longer, the core looping action itself should be quick and punchy to have the most impact.
Ready to stop guessing and start growing? Gainsty uses a powerful mix of AI and expert strategy to get you real, organic followers who genuinely care about your content. Start your journey to authentic Instagram growth today!

.png&w=1920&q=75&dpl=dpl_5vvnEneLD2DAfKTSR86kjNKSWjSC)


.png&w=750&q=75&dpl=dpl_5vvnEneLD2DAfKTSR86kjNKSWjSC)